How to Turn a Podcast, Livestream or Webinar into Shorts in ChatGPT or Claude
Step-by-step: cut a long video into scored 9:16 clips with word-by-word captions from ChatGPT or Claude using BuzzVideo MCP—what it needs, costs and checks.
To turn a long video into shorts with AI, transcribe it with word timestamps, find the moments that open with a strong hook and make sense on their own, cut them on word boundaries, reframe them from 16:9 to 9:16 so the speaker stays in frame, and add word-by-word captions and a short hook title. One podcast, livestream replay or webinar can become five or more Reels, TikToks and Shorts.
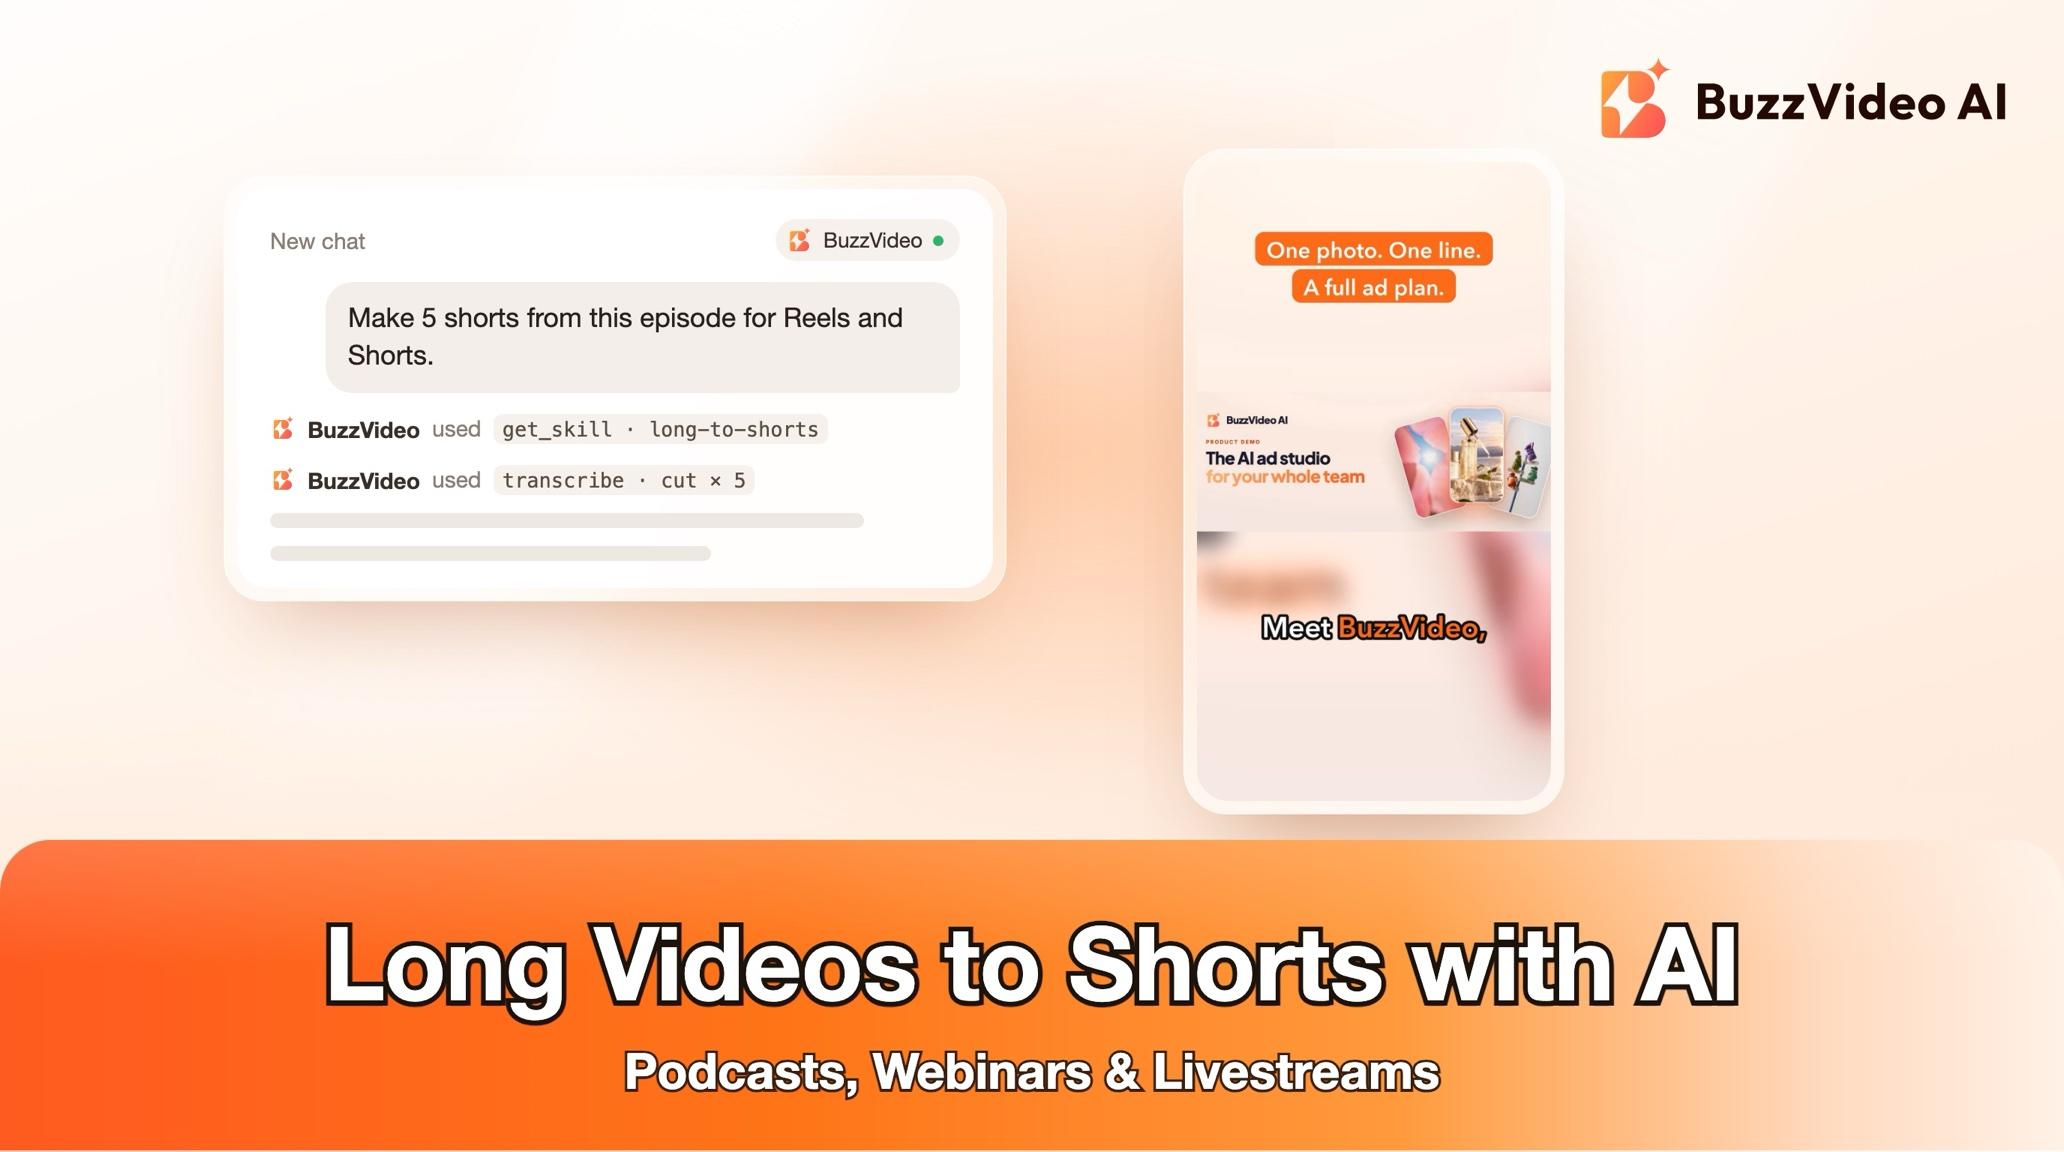
With BuzzVideo MCP you can run the job from ChatGPT or Claude. The chat follows BuzzVideo's Long to shorts guide: it reads the transcript first, scores every candidate clip, lets you pick, then cuts, reframes, captions and reviews each one. Clipping your own footage spends no BuzzVideo credits. Rendering the clips does need an AI app that can run ffmpeg on your computer — more on that below.
What does long-to-shorts repurposing involve?
Repurposing means extracting many short vertical clips from one long recording, rather than editing one video from short clips. The hard part is not the cutting; it is finding the 30 seconds that stop a scroll and still make sense without the other 59 minutes.
| Setting | Default |
|---|---|
| Number and length | 5 clips of 20–45 s (15–30 s for ads) |
| Format | 9:16, 1080×1920 |
| Captions | Word by word, 1–4 words on screen, keywords highlighted |
| Hook title | On screen for the first 2–3 s, 8 words or fewer |
| Loudness | About −14 LUFS, true peak below −1 dB |
| Sources | Livestream replay, podcast, webinar, interview, talk, launch, vlog |
Try it: connect BuzzVideo to your AI chat once, then hand it a recording and ask for the best moments. Connect BuzzVideo MCP →
What do you need before you start?
- A BuzzVideo account on any plan. MCP is included on every plan (pricing); clipping your own footage uses no credits.
- BuzzVideo MCP connected to ChatGPT, Claude or another MCP client — see how to use BuzzVideo MCP in ChatGPT and Claude.
- The long video: a file path, a file to upload, or a link you are allowed to download. Speaker names are optional, for captions.
- An AI app that can run commands on your computer, with ffmpeg installed — needed to render the clips.
- A speech-to-text tool with word timestamps. The guide asks before installing one; the default is faster-whisper.
What does "needs to run ffmpeg" mean for a ChatGPT or Claude user?
ffmpeg is the free command-line tool that actually cuts, crops and captions video files. The guide renders clips by running ffmpeg on your own computer, where your recording lives. That works in AI apps that can run commands locally — a coding agent such as Claude Code, or a desktop chat app with a terminal tool connected. A standard ChatGPT or Claude web chat can't run commands on your computer, so it can't render the clips.
In that case the guide still does the valuable part. It delivers the scored clip list with exact in and out timecodes, hook titles and caption text as SRT files, so you can cut the clips in your own editor or app — and it says clearly that no video was rendered. You need a transcript for this route: if no speech-to-text tool can run, it uses any transcript you already have, such as platform captions or an SRT file, and warns that cut points will be less precise.
How do you turn a long video into shorts step by step?
Step 1 — Share the recording and the brief
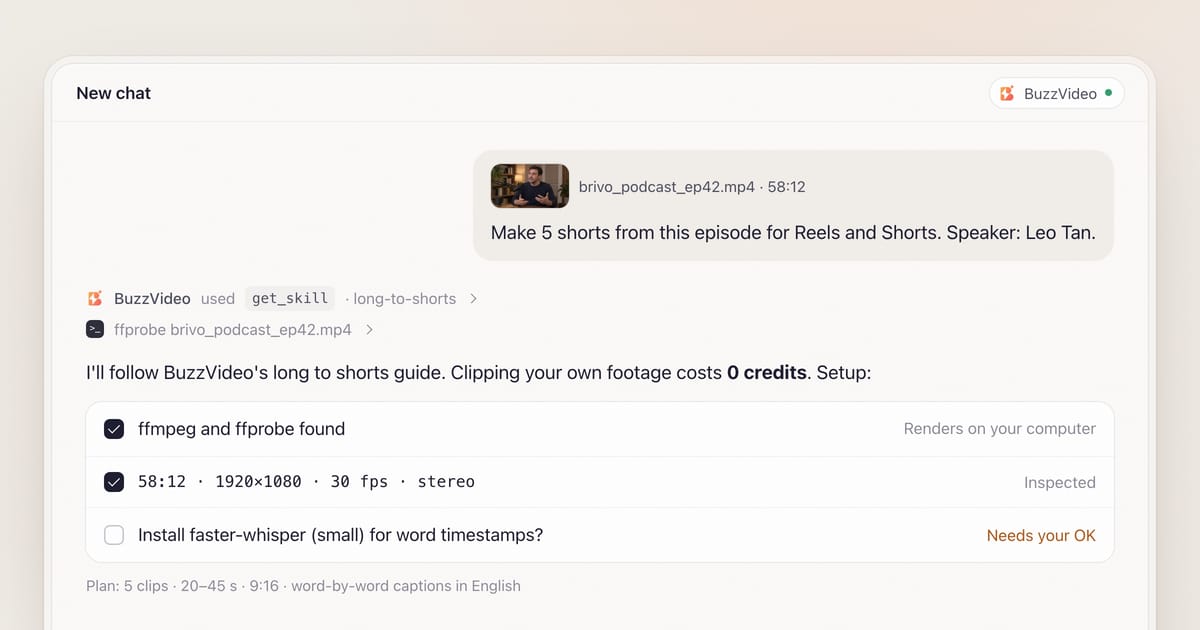
Point the chat to the file and say what it's for. When BuzzVideo MCP is connected, it loads the long to shorts guide (get_skill) and asks the rest in one round: how many clips and how long, the goal (brand awareness, product sales or thought leadership), the platform, and the caption language and style. It checks that ffmpeg and ffprobe are available and keeps everything in one project folder with source, transcript, clips, captions and final subfolders.
Step 2 — Transcript first, then a privacy sweep
The guide extracts the audio once, transcribes it with word timestamps and reads the whole transcript before looking at video, marking topic changes, stories, numbers, strong opinions, audience questions, demos and laughs. A coarse contact sheet shows layout changes such as screen shares or a guest joining.
Then it reads a full-size frame of every distinct screen in the parts it might clip, and lists anything that must not be published: internal or test-environment labels, personal names, workspace or account names, credit balances and real dashboard numbers. Each one is cut or covered later. If a whole segment is internal, it's left out entirely.
Step 3 — Pick from a scored clip list
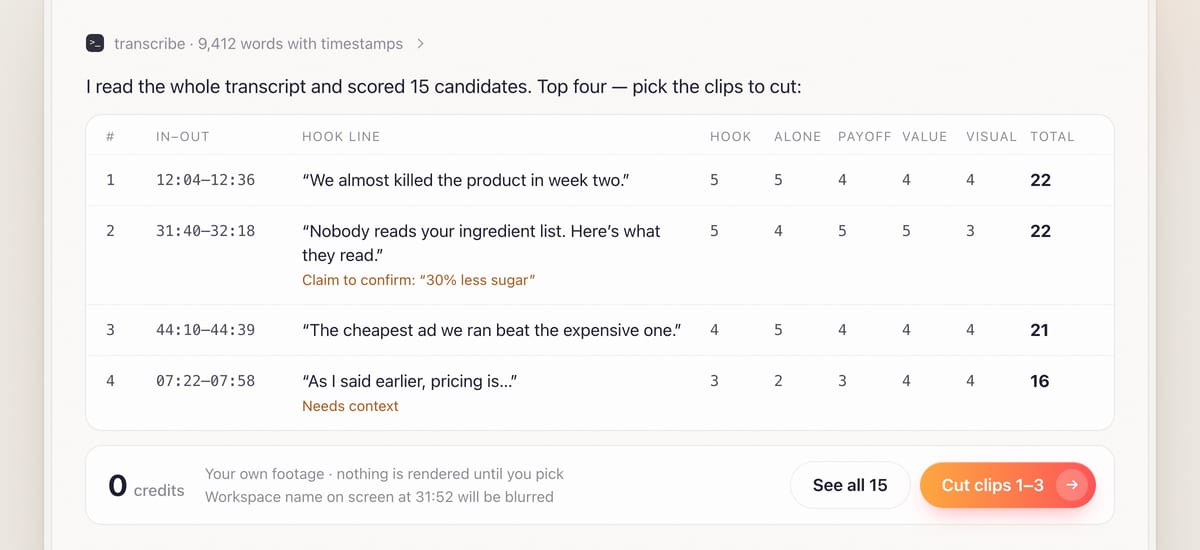
The guide finds two to three times more candidates than you asked for and scores each 1–5 on five things: hook (do the first 3 seconds stop a scroll?), standalone (no "as I said earlier"), payoff (ends on a point), value for your goal, and visual (something worth watching, a speaker you can frame in 9:16). Notes flag claims to confirm and items to cover. You pick the clips — this is the approval gate, and nothing is rendered before you choose.
Step 4 — Cut on word boundaries and reframe to 9:16
Each clip starts on the first word of its hook sentence, with about 0.1 s of air before and 0.2–0.3 s after. Filler words, false starts and long pauses are removed with jump cuts, and every cut falls inside a silence, never mid-word, with a short audio fade so it doesn't click. A strong line from the middle can move to the start as a cold open, only if it still makes sense — and you are told.
The reframe keeps the speaker's eyes about one third down the frame and follows them smoothly. Two speakers are cut on who is talking or stacked; slides go in the upper part with the speaker below; wide shots get a blurred background, never black bars. Gentle 5–10% punch-ins on key sentences keep a talking head alive.
Step 5 — Captions, hook title, then a mandatory review
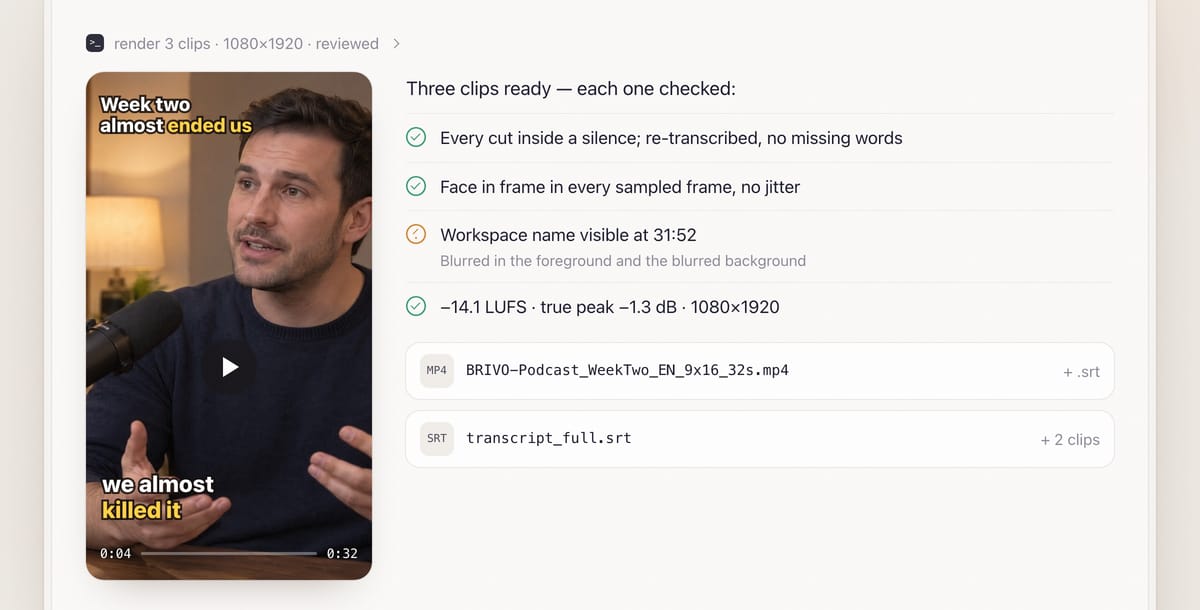
Captions come from the word timestamps after names, brands and numbers are corrected, stay clear of the bottom quarter and right edge, and never cover a face or the product. Every clip is then reviewed: each joint is checked against the word gaps, the finished clip is transcribed again and compared word for word with the source, frames are sampled twice a second for a cropped face, jitter, black frames or any listed private item, and length, resolution and loudness are measured. Clips that fail are fixed and re-rendered.
You get each clip named like BRIVO-Podcast_Pricing_EN_9x16_32s.mp4 with an SRT, the full transcript, and a table with source times, hook title, a suggested post caption with 3–5 hashtags and the score.
Copy-paste prompt
“Turn this [podcast episode] into [5] vertical clips of [20–45] seconds for [Reels and Shorts]: [file path]. Speakers: [names]. Goal: [thought leadership]. Captions in [English], word by word. Show me the scored clip list before cutting anything, and list any claims, prices or names I need to confirm.”
How is each candidate clip scored?
| Score (1–5) | The question | A 5 looks like |
|---|---|---|
| Hook | Do the first 3 seconds stop a scroll? | A bold claim, a number, a question or a surprising result |
| Standalone | Does it make sense with no context? | No unresolved "this" or "as I said earlier" |
| Payoff | Does it end on a point? | A punchline, an answer or a clear takeaway |
| Value | Does it serve the goal? | Shows the product, teaches something or builds trust |
| Visual | Is it worth watching in 9:16? | A demo or expression, speaker easy to frame |
Clips with a claim you can't use, or a person who may not have agreed to be in an ad, are avoided.
What usually goes wrong, and how does the guide prevent it?
| Problem | What viewers notice | What the guide does |
|---|---|---|
| Cut mid-word | A clipped or swallowed word | Cuts only inside silences, checked by re-transcribing |
| Face cropped off | Half a head in 9:16 | Crop follows the face, checked twice a second |
| Clip needs context | "What is he talking about?" | Standalone score; you choose before rendering |
| Private info on screen | Names, balances or test labels | Listed up front, cut or blurred in foreground and background |
| Misheard brand names | Wrong words in captions | Corrected against on-screen spelling; unclear ones asked |
| Unapproved claims | A price or promise you can't run | Every claim listed for you to confirm |
How much does it cost?
Clipping your own footage costs no BuzzVideo credits. Credits only come in if you ask for something generated, such as an AI voiceover intro, an AI B-roll shot or an AI cover image; then the guide shows the plan and an estimate_credits quote and waits for approval. Per-model rates are on our pricing page.
Which BuzzVideo guide should you use instead?
| You want… | Use this guide |
|---|---|
| Many short clips from one long recording | Long to shorts (this one) |
| One finished video from short clips | Video editor |
| Music, B-roll or end cards on a chosen clip | Video editor, loaded by this guide's optional polish step |
| A breakdown of one video's structure | Video understand |
Step-by-step guides: Video editor · Video understand
You don't need to name the guide: describe what you want, and the chat picks the matching one.
Sitting on hours of recordings? Connect BuzzVideo to your AI chat and turn one into a week of posts.
FAQs
Can I do this in a normal ChatGPT or Claude web chat?
You can get the scored clip list, timecodes, hook titles and SRT captions, but not rendered clips. Rendering needs an AI app that can run ffmpeg on your computer.
Does it use credits?
Not for clipping your own footage. Only optional generated extras, such as an AI cover image or B-roll, cost credits, and you see the quote first.
How long can the source video be?
The guide doesn't set a limit. For long files it extracts the audio once and transcribes that, then samples frames rather than scanning every second.
Does it work with two speakers or screen shares?
Yes. Two speakers are cut on who is talking or stacked top and bottom; screen shares go above the speaker or get a punch-in on the area being discussed.
Which caption languages are supported?
By default, the spoken language; bilingual captions are an option. For strong accents and less common languages, the guide uses a larger speech model and checks names and brand words with you.
What do I get at the end?
Each clip as a 9:16 MP4 with an SRT, the full transcript, a table with hook titles, post captions, hashtags and scores, a note of what was cut or covered, and what you still need to confirm.
Last verified: November 2, 2026, against our live pricing and product pages.
Next reads: How to use BuzzVideo MCP in ChatGPT and Claude · Best AI video generators for marketing · What is BuzzVideo AI?

About the author
Monica
Product Manager
As a Product Manager at BuzzVideo AI, I work with marketers and growth teams on AI ad workflows—from brief to shippable creatives. I write about practical product workflows, model choices, and how teams turn product pages into ads that feel native on Meta and TikTok.