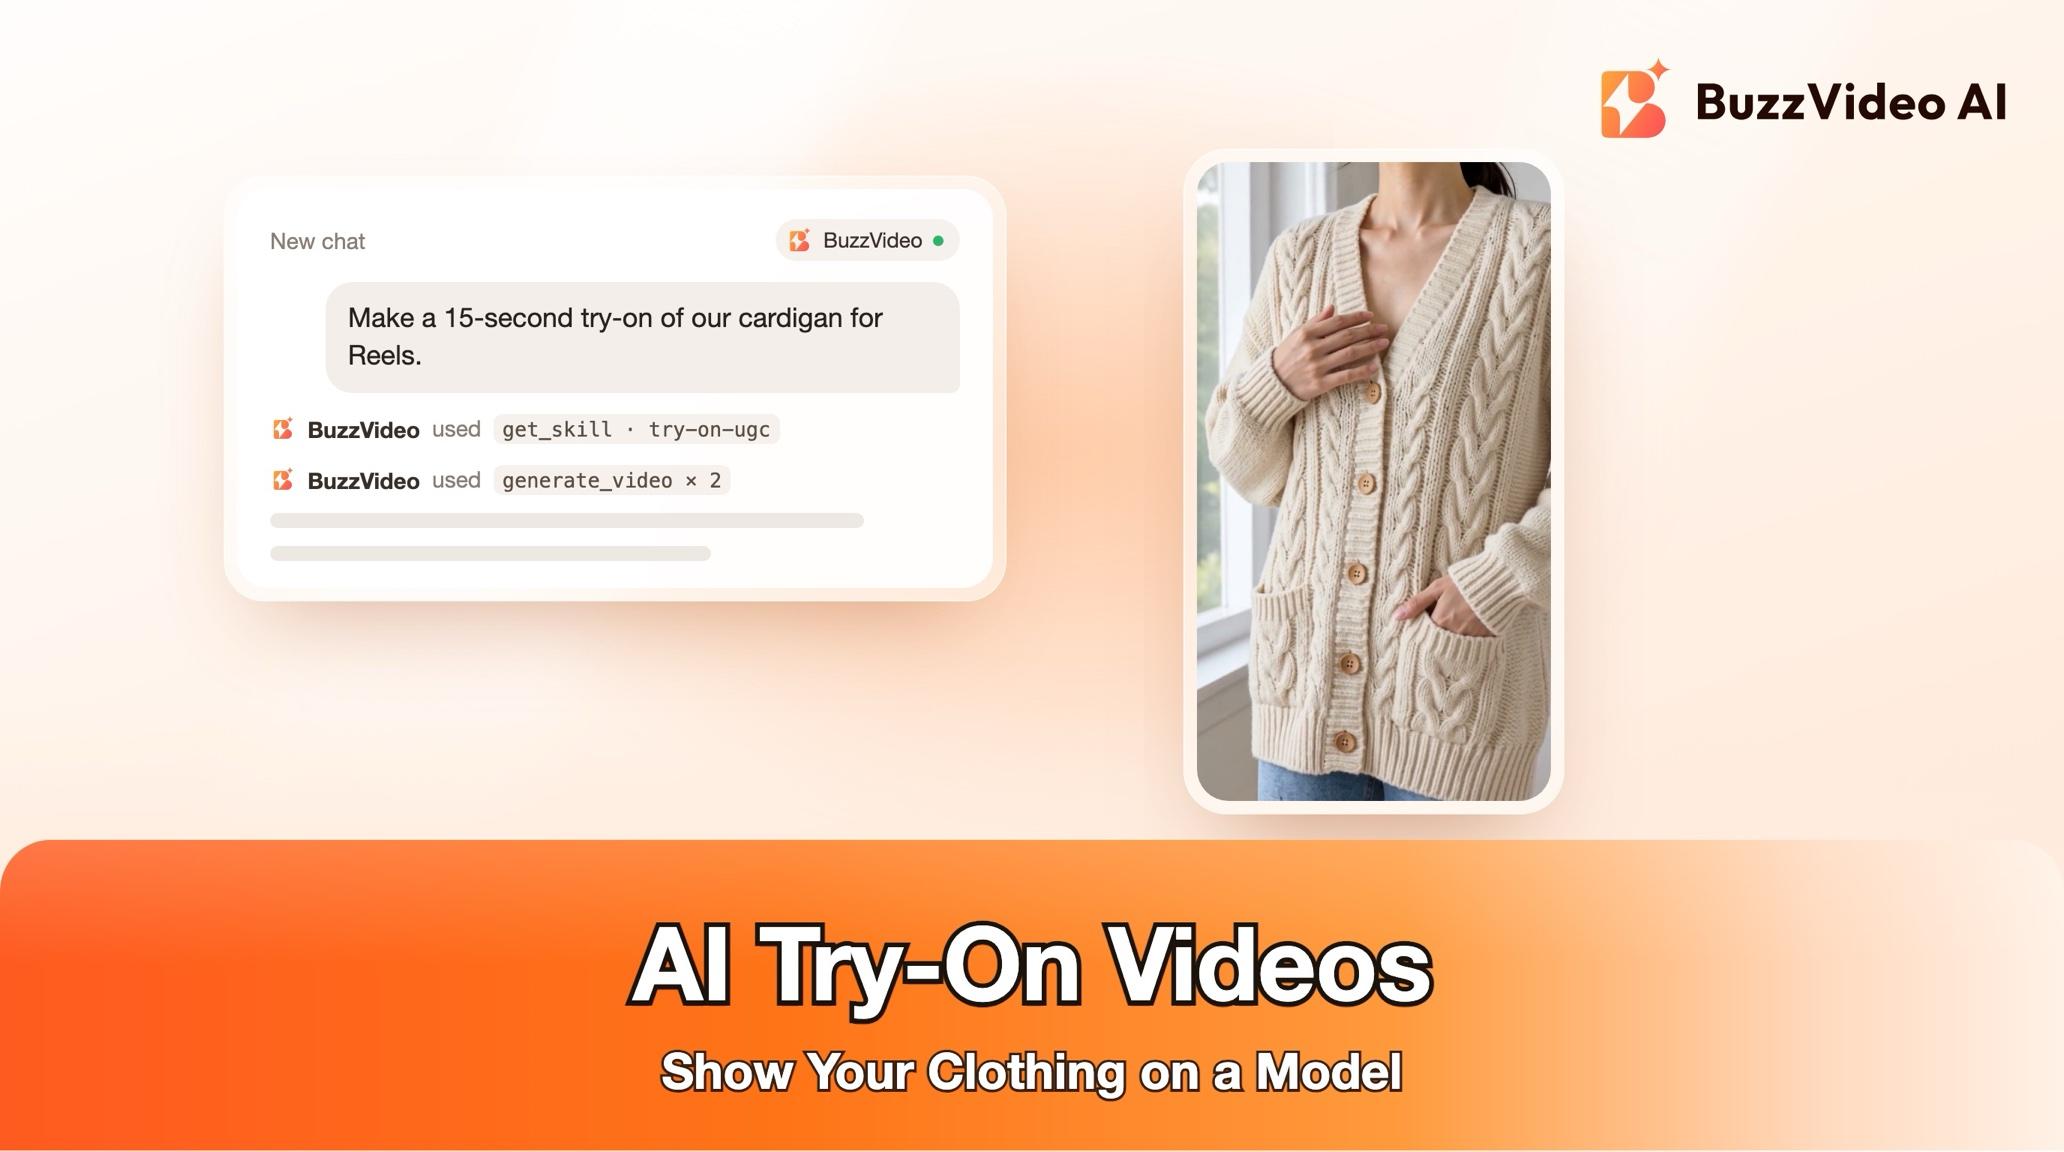
How to Make an AI Try-On Video of Your Clothing in ChatGPT or Claude
Turn garment photos into an AI try-on video inside ChatGPT or Claude with BuzzVideo MCP: a model anchor, a shot list, button counts and a reviewed edit.
To make an AI try-on video, start from clear photos of the real garment (front, back and a close-up of the pattern or logo), generate one approved image of a model wearing it, then animate short clips from that image: the garment on its own, the model turning, walking toward the camera and a detail close-up. Edit them into a 10–30 second vertical fit check, and compare every frame against your photos before you post.
With BuzzVideo MCP connected, you can do this from ChatGPT, Claude or any MCP client. The chat loads BuzzVideo's Try-on UGC guide, writes a garment spec with exact button and pocket counts, shows you the model and the shot list with a credit quote, and generates nothing until you approve.
What is an AI try-on video?
A try-on video shows a piece of clothing or an accessory on a person who turns, walks and shows the details, shot like a creator's mirror video or a quick lookbook clip. Fashion brands use them as Reels, TikTok and Shorts ads and on product pages, because shoppers want to see how something fits and moves before they buy. The AI version puts your real garment on an AI model, so you don't need a shoot for every colourway.
| Part | Guide default |
|---|---|
| Length | 10–30 seconds (about 15 s planned by default) |
| Format | Vertical 9:16 |
| Model | An AI model designed for your customer, a BuzzVideo avatar, or your own model's photo |
| Setting | Bright bedroom mirror (fit check) or clean studio wall (lookbook) |
| Words | Captions only, or an optional line to camera |
| Editing style | Beat-synced, with the wearing reveal on a beat |
Try it: connect BuzzVideo to your AI chat, attach your garment photos and ask for a try-on video. Connect BuzzVideo MCP →
What do you need before you start?
- A BuzzVideo plan with video. Video starts on Starter; Seedance 2.0 and 2.5 need Pro or Ultra (pricing).
- BuzzVideo MCP connected: see how to use BuzzVideo MCP in ChatGPT and Claude.
- Garment photos: front, back, a close-up of the pattern or logo, and an on-body or flat-lay photo if you have one. A clean photo of your own always beats a cleaned-up one.
- The facts you can state: fabric, sizes, colour names and any feature claim such as stretch or waterproof.
- Which colourway and size the model should wear, and styling pieces that won't compete with the item.
How do you make an AI try-on video step by step?
Step 1 — Ask, and confirm the garment facts
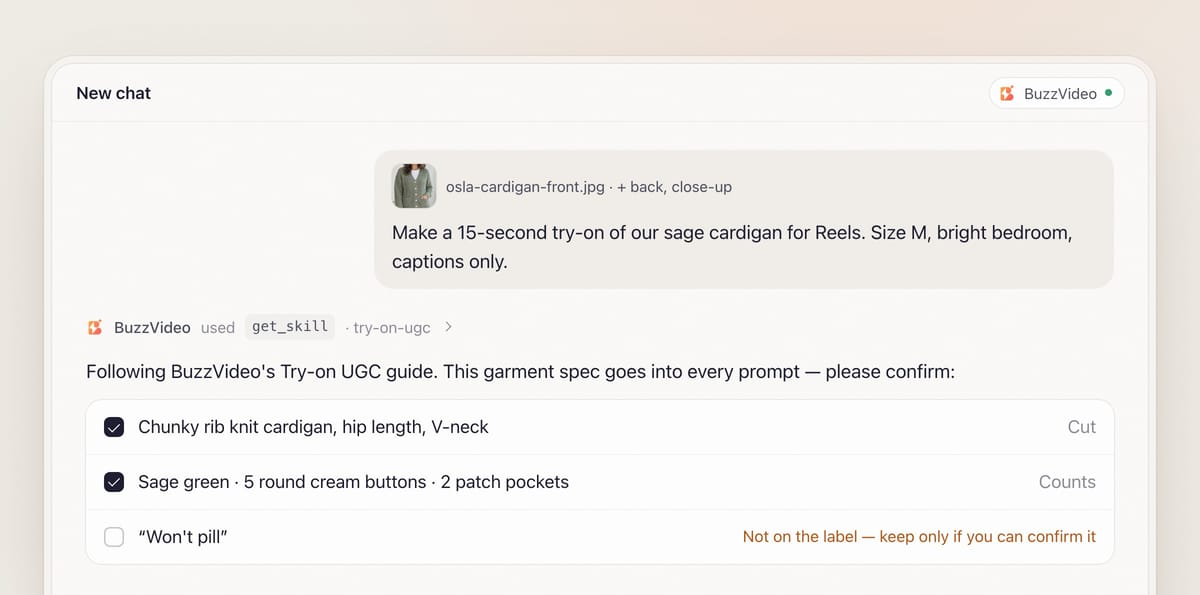
Attach your photos and describe the video. The chat loads the guide (list_skills, then get_skill) and asks one round of questions with defaults: the item and colourway, the model, the setting and voice, and the editing style. Most preset voices are English, and they can also read other languages such as Spanish; the guide plays you a sample first so you can check the accent, or you can use your own recording.
It then lists what it read from the labels or product page (brand, product name, fabric, sizes, colours, feature claims) and asks you to confirm before any of it goes into a caption. Hard-to-read labels get a question, not a guess.
Step 2 — Lock the garment spec
Next comes a garment spec that is pasted into every prompt: type and cut, length, fit, fabric look (matte, sheen, knit, denim), colour names, the pattern's motif, scale and direction, the logo's shape, size and position, and trims with counts: how many buttons, pockets and zips, and the stitching colour. Counts matter because AI loves to add a sixth button.
No back photo? The guide tells you the back will be guessed. You either avoid back views (three-quarter turns only) or confirm the guessed back in review. A wrinkled hanger shot can be turned into a clean garment image on light grey, which you confirm matches the real item.
Step 3 — Pick the model from 2–3 anchor options
The guide generates 2–3 full-body images of the model wearing your garment in the chosen setting, using your garment photos (and your model's photo or a BuzzVideo avatar, if you chose one) as references. The options vary the model, pose or hair, never the garment, and the garment is styled the way it was photographed. Restyling it, such as leaving a cardigan half open, makes the model drop or invent trims.
Each option is compared side by side with your photo, and any with a wrong button, pocket or cable count is rejected. The one you pick becomes the anchor for every shot.
Step 4 — Approve the shot list and the credit quote
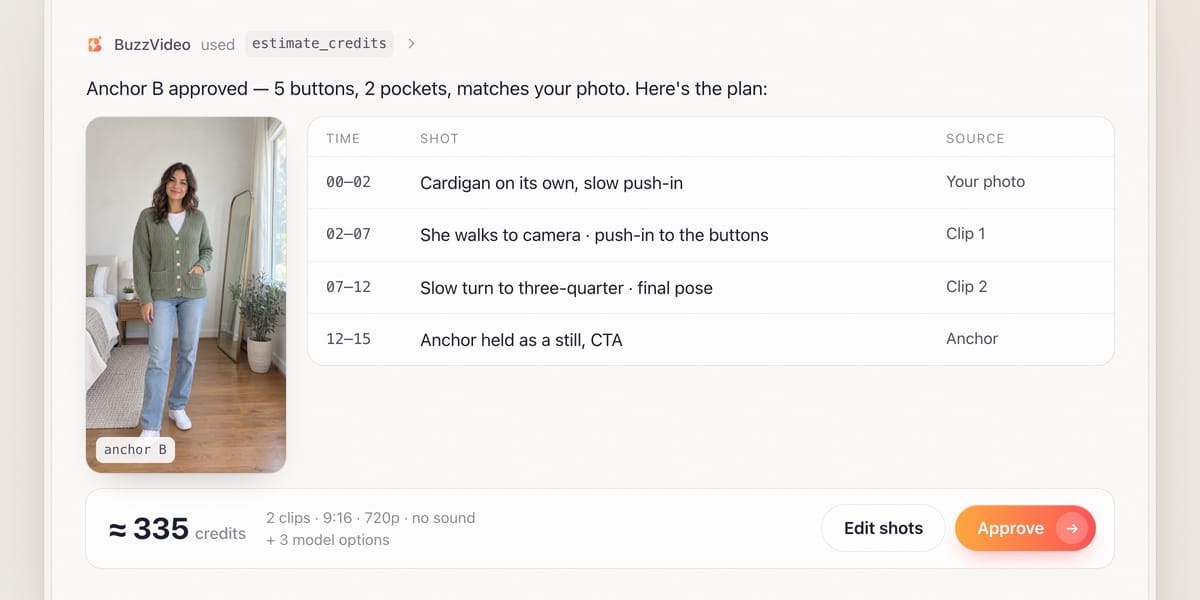
The default 15-second plan opens on your own clean garment photo as a still with a push-in (no generation needed), fitted whole in the 9:16 frame over a blurred copy so sleeves and hem are never cropped. Then: the model appears wearing it, a slow turn, a few steps toward the camera, detail close-ups, and an optional final pose or line. On a small budget, beats are merged into two 4–5 second clips (walk plus push-in to the detail; turn plus final pose). You see the plan with an estimate_credits quote before anything is made.
Step 5 — Generate with slow, simple moves
Each clip uses the anchor plus your garment photos as references, the spec with its counts, and the instruction that the person and garment stay identical. Movement is kept slow and simple, because big spins and fast motion make patterns slide and logos warp. If the model speaks, the guide picks a video model that generates speech with lip movement; otherwise generated sound is off. Failed tasks are refunded, and you're offered one retry.
Step 6 — Check, edit and review
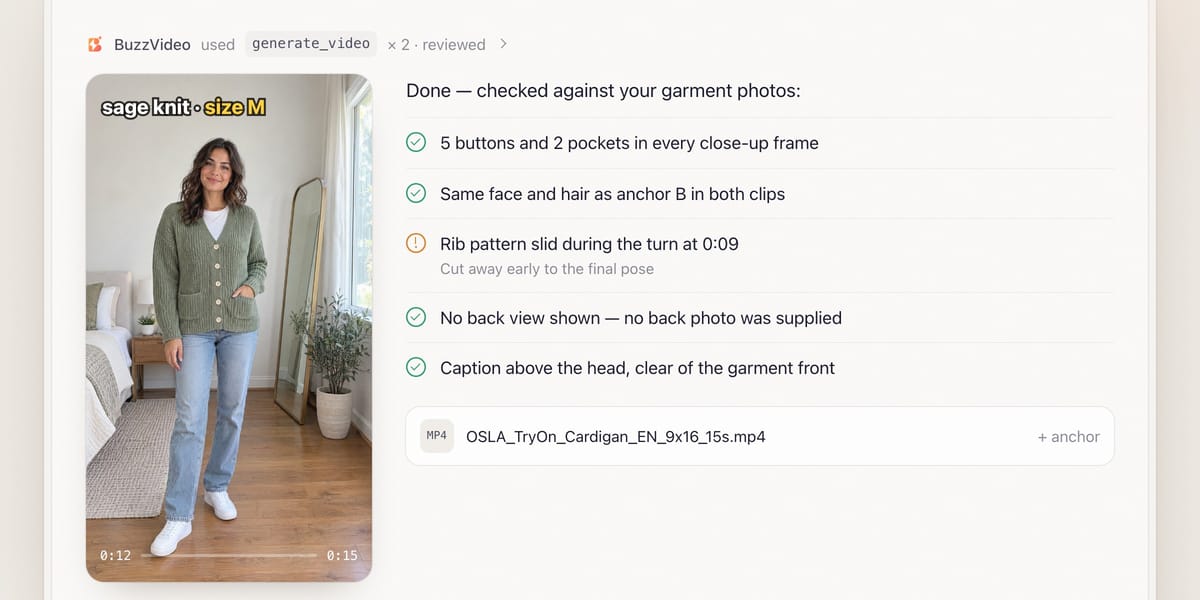
Frames from the turn and walk are compared with your photos, and buttons and pockets are counted in a close-up frame. If a pattern keeps drifting, the shot is shortened, slowed, or replaced by the detail close-up or the garment still. In the edit, the garment is on screen in the first second and the wearing reveal lands on a beat. Captions name the item, colour and size worn, using confirmed facts only, and stay clear of the garment front and the face. Generated walks often end mid-step, so the cut usually ends on the approved anchor as a still with a slow push-in.
A mandatory review then checks every shot again before you get a file like OSLA_TryOn_Cardigan_EN_9x16_15s.mp4, plus the model anchor and raw shots.
Copy-paste prompt
“Make a [15]-second try-on video of this [cardigan] for [Reels], 9:16. Photos attached: front, back and a close-up of the [buttons]. Model: [a woman in her late 20s, warm medium skin, wavy dark hair], wearing size [M], styled with [white tee and light jeans], in a [bright bedroom with a mirror]. Captions only. Read me the garment spec with counts, show 2–3 model options, then the shot list and credit quote before generating.”
What should you check in an AI try-on video?
| Check | Compare against | Why it fails |
|---|---|---|
| Button, pocket and zip counts | Close-up garment photo | Models add or drop trims, especially when restyled |
| Pattern scale and placement | Front photo | Patterns slide during turns and walks |
| Logo shape and position | Logo close-up | Logos warp at angles |
| Hem length and neckline | Flat-lay or on-body photo | Proportions drift between shots |
| Back view | Back photo, or flagged as guessed | Without a photo the back is invented |
| Face, hands, feet | Model anchor | Different face or warped fingers between shots |
What usually goes wrong, and how does the guide prevent it?
| Problem | What shoppers notice | What the guide does |
|---|---|---|
| Wrong trims | "Mine has four buttons, not five" | Counts written into every prompt; anchors with a wrong count rejected |
| Melting fabric | Garment blends into the body | Slow, simple moves; glitchy frames cut away |
| Guessed back | Back doesn't match the real item | Back views avoided or flagged for your confirmation |
| Face drift | A different person in the walk | One approved anchor for every shot |
| Captions over the outfit | Can't see the front of the garment | Captions placed in empty space; dropped on detail close-ups |
| Overclaiming | "Waterproof" when it isn't | Fabric and feature claims confirmed with you first |
How much does an AI try-on video cost?
You pay in credits and approve the quote first. As a rough example, the small-budget plan (your own garment photo as the opening still, plus two 5-second Seedance 2.0 clips at 720p) costs about 260 credits for video, plus about 75 credits for three model options on Nano Banana Pro: roughly 335 credits, or about $2.35 on Pro billed yearly. More clips or a premium model cost more. See our pricing page and BuzzVideo pricing and cost per ad.
Which BuzzVideo guide should you use instead?
| You want… | Use this guide |
|---|---|
| Clothing or accessories worn by a model | Try-on UGC (this one) |
| Hands opening a box and revealing the product | Unboxing UGC |
| A presenter reviewing a non-wearable product | UGC product review |
| The same ad with different talent swapped in | Ad variations |
Step-by-step guides: Unboxing UGC · UGC product review · Ad variations
Describe what you want in plain words and the chat picks the matching guide.
Do AI try-on ads need an AI label?
Yes, plan on it: the model is an AI-generated person. TikTok allows AI-generated ad content only when it is disclosed, with its AIGC label or your own clear disclaimer (TikTok ad policy), and Meta shows an "AI info" label on ads made or significantly edited with generative AI, including some made with third-party AI tools (Meta). For a native creator feel, read AI UGC ads that don't look fake.
Ready to see your garment on a model? Connect BuzzVideo to your AI chat and send the photos.
FAQs
Does it work for accessories, not just clothes?
Yes. The guide covers bags, shoes, hats, jewellery and glasses as well as garments, with detail close-ups of the accessory on the body.
Can I use my own model instead of an AI model?
Yes. Send a photo of your model, or pick a BuzzVideo avatar. Either becomes a reference for the anchor image, so the same face appears in every shot.
What if I don't have a photo of the back?
The guide tells you the back will be guessed. It either keeps to front and three-quarter views or shows you the guessed back to confirm in review.
Will the colour match my real product?
That is one of the review checks. Colour, pattern, logo and length are compared with your photos, and you are asked to confirm the garment on screen matches the real product before you use it.
Last verified: November 2, 2026, against our live pricing and product pages.
Next reads: How to use BuzzVideo MCP in ChatGPT and Claude · AI UGC ads that don't look fake · Best AI ad generators for TikTok
About the author
Monica
Product Manager
As a Product Manager at BuzzVideo AI, I work with marketers and growth teams on AI ad workflows—from brief to shippable creatives. I write about practical product workflows, model choices, and how teams turn product pages into ads that feel native on Meta and TikTok.