How to Direct AI Video Shot by Shot with a 3D Blockout in ChatGPT or Claude
Plan every shot, build a grey 3D blockout and previs, then generate photoreal shots that follow it—inside ChatGPT or Claude with BuzzVideo MCP.
To get real camera control in AI video, plan each shot first—camera position, lens, move and the character's action—then build a simple grey 3D blockout of the scene, render a rough reference clip per shot, and use those clips (or one approved still per shot) to generate the photoreal shots. With BuzzVideo MCP you can run this from ChatGPT or Claude: the chat follows BuzzVideo's 3D director guide, gets your approval on the shot plan and the previs, and only then quotes and spends credits.
The 3D part runs on your computer, not in BuzzVideo, so what you get depends on what the chat can do there. Below: each route and its fallback, the prompt, the shot-plan fields, cost and review.
What is a 3D blockout for AI video?
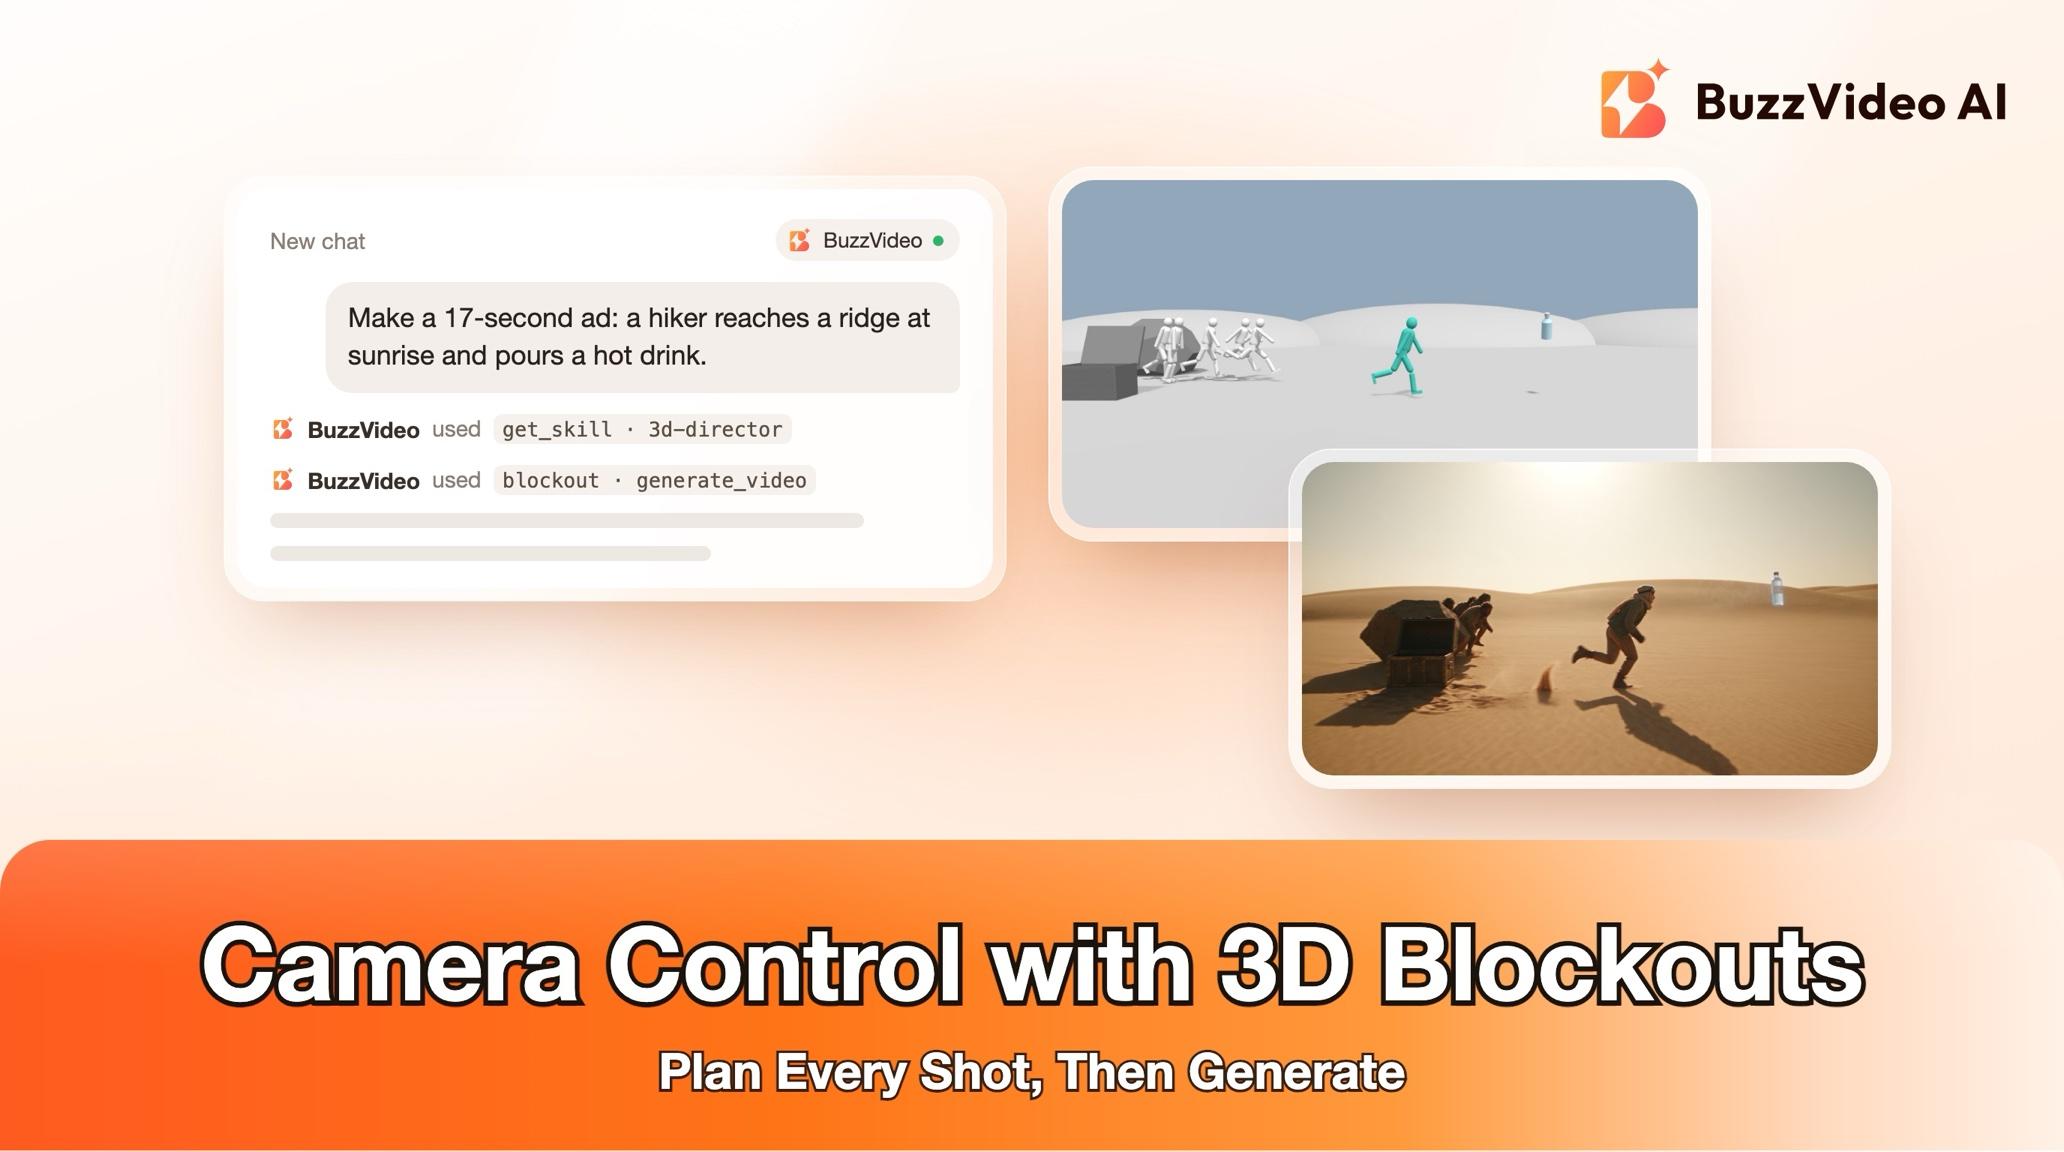
A blockout (or previs) is a quick, untextured version of a scene: grey boxes for the set, a simple mannequin, a product proxy and one virtual camera per shot. For AI video it fixes the usual complaint—"I asked for a low-angle orbit and got something else"—because the model gets a picture of the move, not only a sentence.
| Part | Typical choice |
|---|---|
| Length | 15–20 seconds, 4–6 shots ending on the product (your shot count wins if you give one) |
| Format | 9:16 by default; 16:9 or 2.39:1 letterbox for a cinematic look |
| Blockout | Grey shapes at real-world scale, product proxy at true size |
| Lens | 24–35 mm wide, 50 mm natural, 85–135 mm portrait or product |
| Previs | Low-res clip per shot, joined into a rough cut; free to change |
Try it: connect BuzzVideo to your AI chat once, then describe your story and the shots you have in mind. Connect BuzzVideo MCP →
What do you need before you start?
- A BuzzVideo account with video. Video starts on Starter; Seedance 2.0 and 2.5 need Pro or Ultra (pricing).
- BuzzVideo MCP connected to ChatGPT, Claude or another MCP client — see how to use BuzzVideo MCP in ChatGPT and Claude.
- A chat that can write files and run commands on your computer for the blockout (for example a desktop or coding client). Without it, the guide falls back to storyboard frames.
- Your story: the idea or script, the product's role and the one beat that must land.
- Character and product photos, plus 1–3 reference stills or films for the look if you have them.
How do you direct an AI video shot by shot?
Step 1 — Describe the story; the guide picks a route
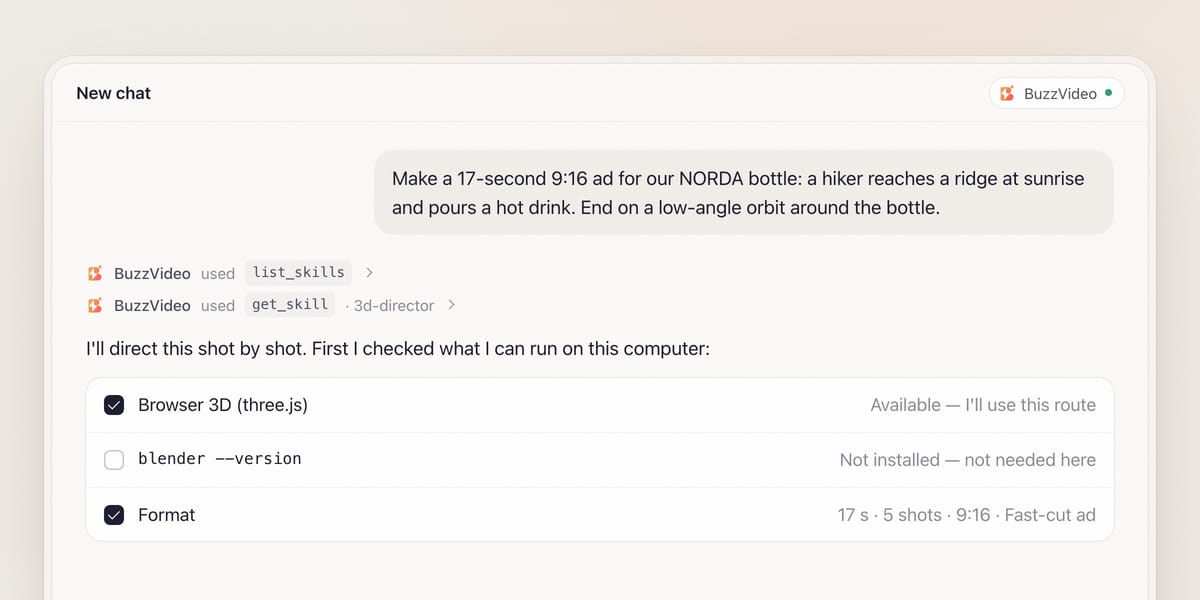
Say what happens, where, and how it should feel. The chat loads the 3D director guide (get_skill), asks in one round about the story, the look, the format and the editing style (Fast-cut ad by default for social), then tells you which route it will take and why:
| Route | When | How the reference clips are made |
|---|---|---|
| Browser 3D (default) | The chat can write files and run a browser | One three.js file with simple shapes, a primitive mannequin and one camera per shot, captured in a headless browser |
| Blender | Shots need real character animation and Blender is installed | The scene is scripted and rendered in background mode |
| Image to 3D model | You want your character or product as a 3D model first | Handed to the Photo to 3D guide; if no real model comes back, back to a grey blockout |
| No 3D capability | The chat can't run anything locally | One storyboard frame per shot with generate_image, approved, then animated — camera control is looser |
It never installs software without your OK.
Step 2 — Lock the character and product references
If a person appears in more than one shot, the guide first makes one character sheet—or uses a BuzzVideo avatar—and uses it in every shot. No celebrity likenesses. It writes one product description reused in every prompt (shape, colours, cap, logo and every legible label line) and lists the brand, product name and any benefit claim for you to confirm.
Step 3 — Approve the shot plan
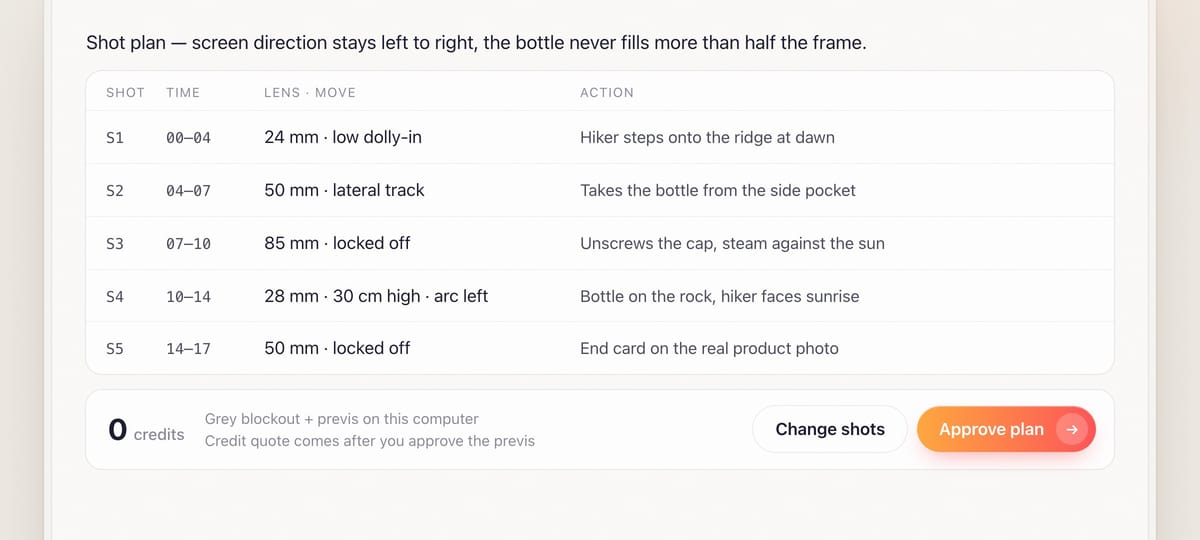
The story becomes beats, then shots. For each shot you see the duration, camera position and height, lens, the move with start and end framing, the character's action and eyeline, which side of the product faces camera, the light and the transition. Screen direction stays consistent (the 180° rule), and the product stays under about half the frame height—closer than that, generated small print becomes readable and garbled.
Step 4 — Watch the free previs
The set is built at real-world scale in grey, the mannequin is posed per shot, and each camera gets the planned lens and an eased move. Each shot is rendered as a short low-res clip at your ratio, plus first- and last-frame stills, and joined with ffmpeg into a previs cut so you can judge timing. Changes here cost nothing, so this is the moment to move the camera, swap a lens or cut a shot.
Step 5 — Approve the quote and generate the photoreal shots
After you approve the previs, you get an estimate_credits quote. The renders are files on your computer, and BuzzVideo can't read local paths, so the guide asks you to add the named clips and stills to the chat (request_upload), then uses them:
- Main route: each render clip goes in as the reference video, with the character sheet and product photo as reference images. The prompt says the reference video sets camera, lens, move, blocking and timing and must be followed exactly; the words add the real look.
- Fallback (the usual case): if you can't upload the renders, or the model doesn't take reference videos, the guide generates one first-frame still per shot that copies the planned framing, checks it against the render and the other stills, then animates it. It tells you motion now follows the prompt only.
Step 6 — Edit, review and deliver
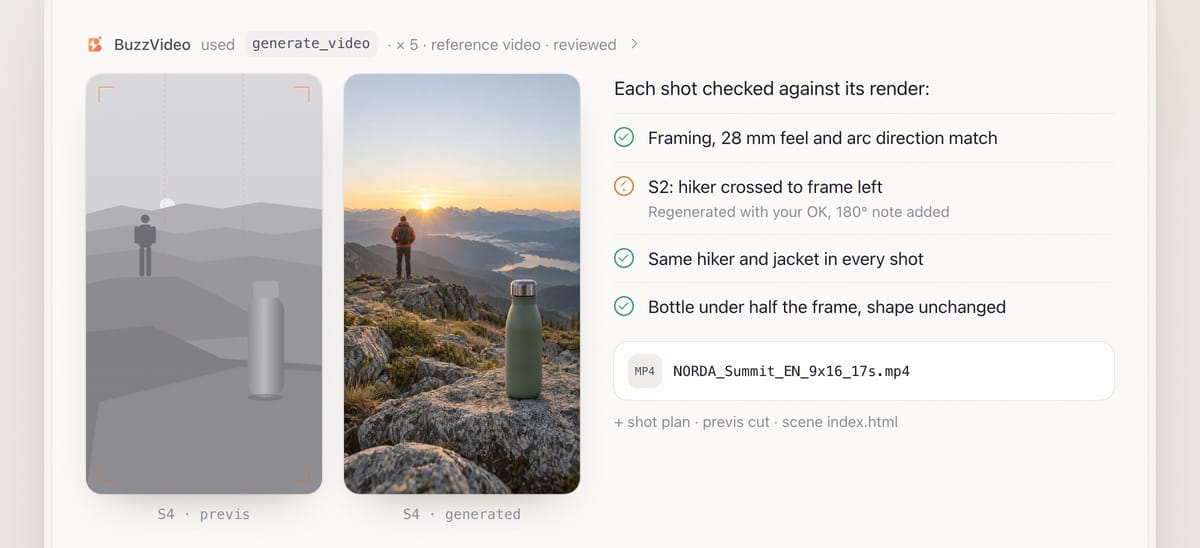
The shots are cut with the Video editor guide in your chosen style, timed to the previs. Review is mandatory: each shot is compared with its render for framing, lens feel, move and timing; character and product are checked against their references; the closest product frame is inspected at full size; and every frame is checked for warped hands, objects appearing or vanishing, and captions over faces or the product.
You get the film (for example NORDA_Summit_EN_9x16_17s.mp4), the approved shot plan, the previs cut, the per-shot renders and the scene file (index.html or .blend) so you can re-direct later.
Copy-paste prompt
“Direct a [17]-second [9:16] ad for [our NORDA insulated bottle]. Story: [a hiker reaches a ridge at sunrise and pours a hot drink]. The beat that must land: [steam rising against the sunrise]. Look: [cold blue dawn, warm sun, natural light]. Shots I want: [low-angle orbit at the end on the bottle]. Build a grey blockout and previs first, show me the shot plan, then quote before generating.”
What goes into a good shot plan?
| Field | What to write | Example |
|---|---|---|
| Camera | Position, height, shot size | Behind the rock, 30 cm high, medium wide |
| Lens | Focal length for the feel | 28 mm wide, slightly dramatic |
| Move | Start and end framing | Slow arc left, ends with the bottle on the right third |
| Action | Pose, action, eyeline | Hiker faces the sun, back to camera |
| Product | Position, which side faces camera, max size | Upright on the rock, front to camera, under half the frame |
What usually goes wrong, and how does the guide prevent it?
| Problem | What viewers notice | What the guide does |
|---|---|---|
| Ignored camera direction | "I asked for an orbit" | Render clip or matching still as the reference; shots that ignore it fail review |
| Character drift | A different face in shot 3 | One character sheet or avatar for every shot |
| Set changes between shots | Props move or vanish | Later stills use the approved shot-1 still as a reference |
| Flipped screen direction | The hiker jumps sides | 180° rule and frame-edge notes in the plan |
| Garbled label | Misspelt logo up close | Product kept under half the frame; closest frame checked at full size |
| Under-shot angles | "Low angle" looks eye-level | Describes what must and must not be visible in frame |
How much does it cost?
The blockout and previs are made on your computer and cost no credits. As a rough example, five 5-second 9:16 shots on Seedance 2.0 at 720p with a reference video come to 800 credits (160 each), plus about 20 for a character sheet and product still at High on GPT Image 2.5 Sunburst—roughly 820 credits, about $5.90 on Pro billed yearly. The still-and-animate fallback is a little cheaper (130 per shot without a reference video). The guide always quotes first. Per-model rates are on our pricing page; see also BuzzVideo pricing and cost per ad.
Which BuzzVideo guide should you use instead?
| You want… | Use this guide |
|---|---|
| A directed story or brand film with planned camera moves | 3D director (this one) |
| A product-only turntable or exploded view | 3D product video |
| A figurine or 3D look from a photo | Photo to 3D |
| A copy of an existing viral video's edit | Viral remix |
| A multi-episode drama | Short drama |
Step-by-step guides: 3D product video · Photo to 3D · Viral remix · Short drama
You don't need to name the guide: describe what you want, and the chat picks the matching one. If you already have a storyboard and just need consistent shots, read storyboard to video with consistent ads.
Do these ads need an AI label?
If the film shows photoreal AI people or uses AI voices and runs as an ad, usually yes. TikTok requires its AI-generated content disclaimer for such ads (TikTok ad policy), and Meta shows an "AI info" label on ads made or significantly edited with generative AI (Meta).
Ready to direct instead of hoping? Connect BuzzVideo to your AI chat and describe your first shot.
FAQs
Do I need Blender or 3D skills?
No. The default route builds the blockout as a single three.js web page and captures it in a headless browser; Blender is only used if it is installed and the shots need real character animation. You only watch the previs and give notes.
What if my AI chat can't run anything on my computer?
The guide describes each shot's camera and blocking in words, generates one storyboard frame per shot, gets your approval and animates those. You still get a shot plan and consistent frames, but camera control is looser, and the guide says so.
Why do I have to upload the renders?
BuzzVideo can only read files you attach in the chat or public links, not paths on your computer. If you can't add them, the guide makes matching stills instead and tells you the motion will follow the prompt only.
Can I start from my own character or product photo?
Yes. Your photos become the references for every shot. If you want them turned into a 3D model first, the guide hands that step to Photo to 3D, which only returns a real model when a 3D tool is available.
What do I get at the end?
The edited film, the approved shot plan, the previs cut, per-shot renders and the scene file, plus the final shot table, models, credits spent and what review caught. If the final film couldn't be rendered, you get the shots, previs and an edit plan.
Last verified: November 2, 2026, against our live pricing and product pages.
Next reads: Storyboard to video with consistent ads · How to use Seedance · How to use BuzzVideo MCP in ChatGPT and Claude
About the author
Monica
Product Manager
As a Product Manager at BuzzVideo AI, I work with marketers and growth teams on AI ad workflows—from brief to shippable creatives. I write about practical product workflows, model choices, and how teams turn product pages into ads that feel native on Meta and TikTok.